OpenShift as An Application Platform: Trusted - Comprehensive - Consistent(45 mins)
This module will give you a comprehensive understanding of OpenShift as an Application Platform that can accelerate their day-to-day activities, from modernization to build, deploy, manage, and auto-scale your applications with serverless in the open hybrid cloud.
Introduction
In this module you will:
-
Review the OpenShift as an Application Platform capabilities.
-
Migrate two applications to OpenShift using the Developer Perspective using Deployment and Serverless types.
-
Learn about Serverless Deployments and OpenShift Pipelines
-
Explore application status, cpu usage and events
OpenShift as an Application Platform Overview
Red Hat OpenShift is a trusted, comprehensive, consistent application platform based on open standards with key capabilities that help you successfully develop,deliver and run legacy and cloud-native applications.
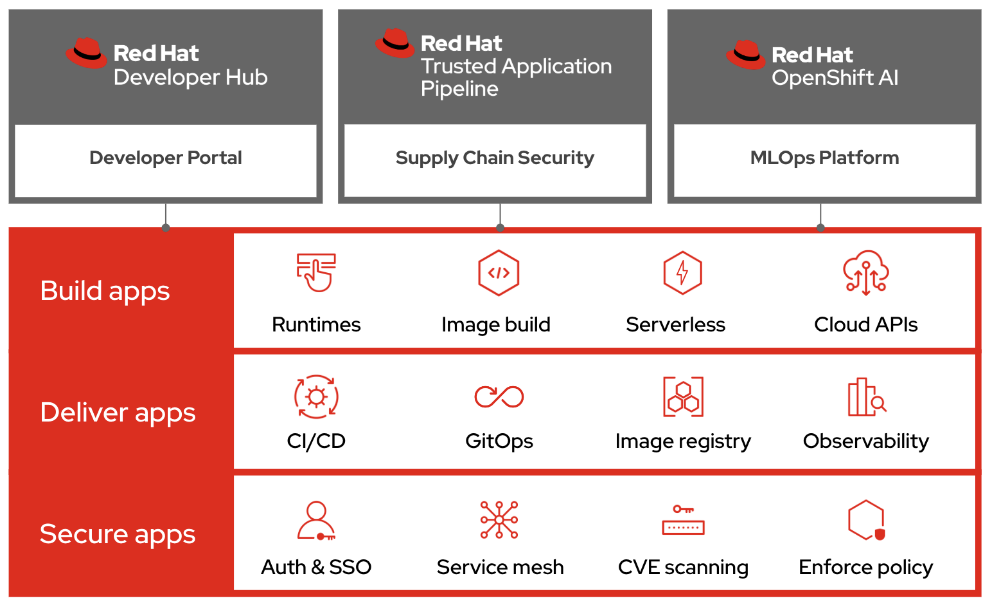
Fig 1. The image shows an Overview of OpenShift as an Application Platform.
-
Built on the trusted foundation of Red Hat Enterprise Linux, Red Hat OpenShift provides a flexible, scalable foundation for modern application development across hybrid cloud environments—including onsite infrastructure, public cloud resources, and edge devices.
-
Red Hat OpenShift provides a comprehensive application platform that helps streamline secure, scalable development across varied environments, addressing modernization and deployment hurdles and boosting developer productivity and operational efficiency with extensive tooling and services.
-
Red Hat OpenShift gives developers, operations and platform engineers a single, consistent user experience and the freedom to quickly build and deploy apps anywhere using the tools they want anywhere, whether they are on-premise, on a public cloud, at the edge, or using a hybrid infrastructure.
Exploring OpenShift as an Application Platform from the OpenShift console
In this section we will explore some of the capabilities discussed such as Image Build, Runtimes, Serverless and CI/CD.
Red Hat OpenShift allows you to use the Developer perspective to build applications and associated components and services, define how they work together, and monitor their health over time.
Working with UBI Images
Red Hat Universal Base Images (UBI) are OCI-compliant container base operating system images with complementary runtime languages and packages that are freely redistributable. (Re)Introducing the Red Hat Universal Base Image
The Developer perspective allows you to select a UBI image to be used as a base image for the new applications that will be built and deployed in OpenShift.
Working with Serverless
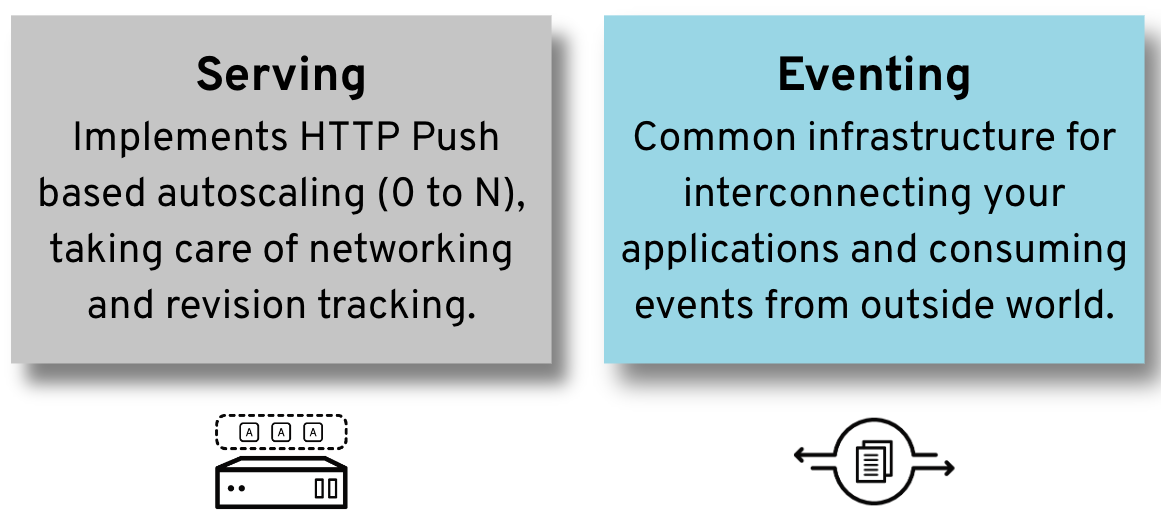
The serverless cloud computing model provides developers with a modern, cloud-native app dev stack for hybrid clouds. Serverless lets developers focus on their code without worrying about the infrastructure. Red Hat® OpenShift® Serverless allows you to avoid being locked into a single vendor and enables a multicloud approach. Red Hat OpenShift Serverless, based on the open-source Knative project, is your bridge to streamlined, efficient, and scalable event-driven cloud-native app development. Knative has two main components Knative Serving and Knative Eventing.
Benefits of Serverless
-
Simplified cloud native development
-
Automatic scaling
-
Multi-cloud portability
-
Comprehensive integration
-
Built-in security
-
Enterprise-grade application platform
Knative Eventing
-
Knative Serving allows you to create Knative services and functions on your cluster. It also allows you to use additional functionality such as autoscaling and networking options for your applications.
-
With Knative Eventing you can create Knative components such as event sources, brokers, and channels and then use them to send events to applications or external systems.
Modernize applications using OpenShift Web Console
Application Overview
-
Web NodeJS: The application recently created is the UI enabling users to interact with the coolstore.
-
Gateway-vertx: A Java application that works as a gateway between the UI and the rest of the application services.
-
Inventory: A Java-based application built with Quarkus that provides the inventory information for each specific product. The data is shown in the UI as to how much quantity is available on each product.
-
Catalog: A Java-based application built with Spring Boot to provide all the catalog information. The catalog data will not be visible in the UI without this service.

Image showing the final topology view that makes the coolstore microservices
Building a Serverless application with the OpenShift Application Platform
Access the OpenShift Web Console
You can access the OpenShift Console at the following URL:
You will see a login screen with two options, select the Keycloak option.
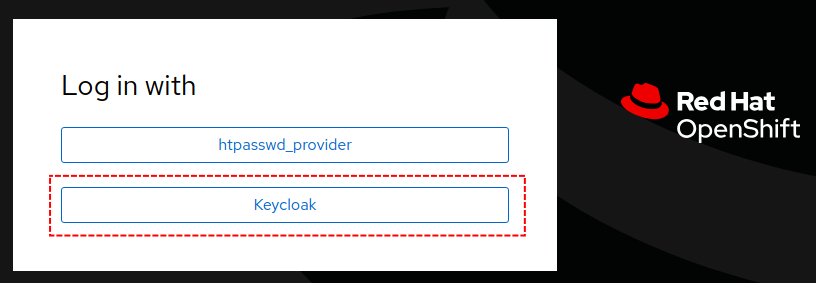
If you accidentally login with the htpasswd_provider option then you will not be
able to login to OpenShift with Keycloak. Please ask your instructor
to correct it by deleting the OpenShift user and identity before logging in again
with Keycloak.
|
You will be redirected to Keycloak, use your credentials to login:
-
User:
{user} -
Password:
{password}
Once you have logged in you will be redirected back to the OpenShift Console.
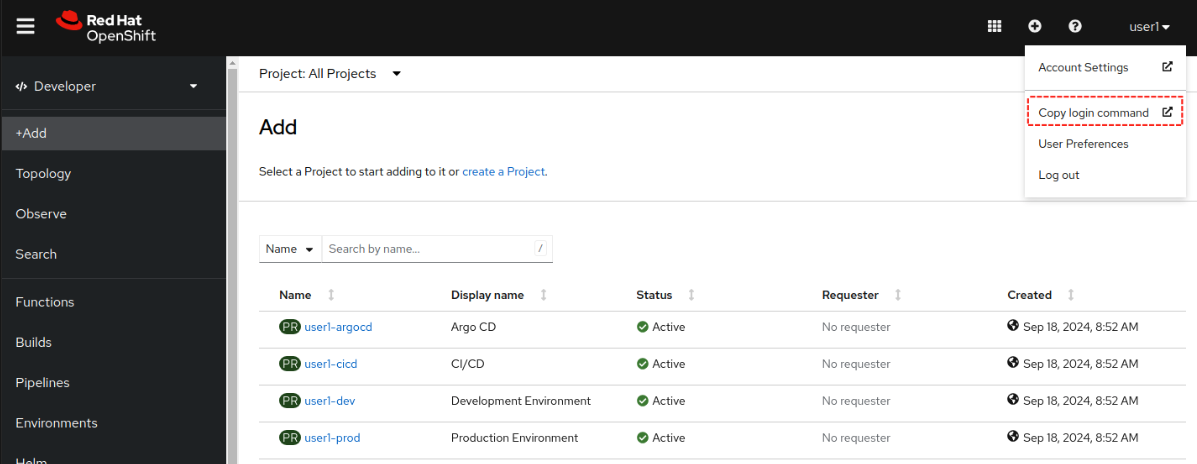
Log in the OpenShift using the terminal:
Since we are using Keycloak SSO you will need to copy the CLI login
command from the console. To do so, click on your user name in
the upper right corner and select Copy login command
This will redirect you to Keycloak to login with your credentials:
-
User:
{user} -
Password:
{password}
Once you have logged in you will see a page with a link Display Token, click
the link to view the token. Copy the oc login command as per below and paste
it into the terminal.
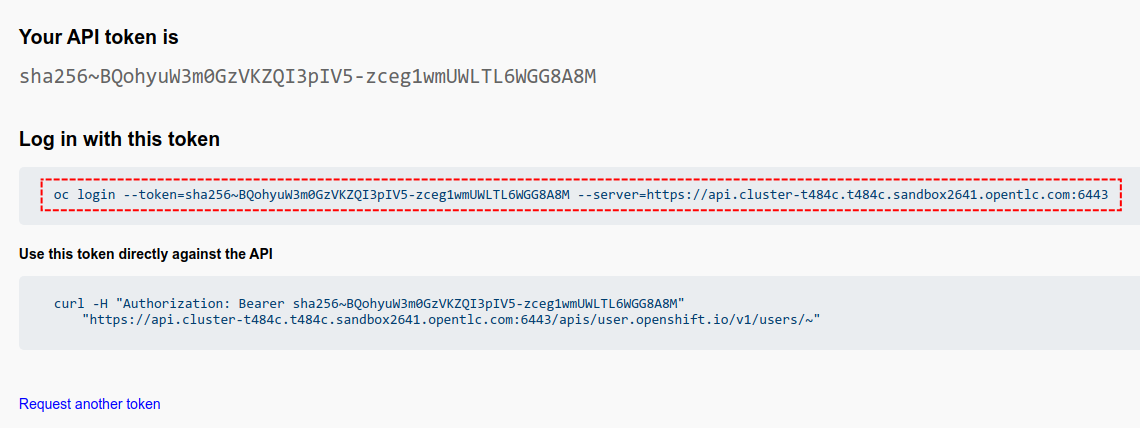
When you paste the copied command into the terminal you will be prompted to accept the certificate, enter 'y' as per below:
[lab-user: ~]$ oc login --token=sha256~F2yqBi9f01H0AJHxwozAERhGbKvX4RMFBba-ijY27t0 --server=https://api.cluster-jpq8b.jpq8b.sandbox406.opentlc.com:6443
The server uses a certificate signed by an unknown authority.
You can bypass the certificate check, but any data you send to the server could be intercepted by others.
Use insecure connections? (y/n): y

WARNING: Using insecure TLS client config. Setting this option is not supported!

Logged into "https://api.cluster-jpq8b.jpq8b.sandbox406.opentlc.com:6443" as "{user}" using the token provided.

You have access to the following projects and can switch between them with 'oc project <projectname>':

  * {user}-argocd
    {user}-cicd
    {user}-dev
    {user}-prod

Using project "{user}-argocd".
Welcome! See 'oc help' to get started.
In later versions of OpenShift you can avoid this process by using oc login --web <openshift-api-url>. This
will start a web server running on localhost to handle the OIDC redirect process. Unfortunately in this
workshop since we are running the terminal inside a pod there is no way for Keycloak to redirect back to
the terminal in the pod hence we use the "Copy login command" flow in this workshop.
|
Create your project
-
Create a new project to deploy the {app_name}. Run the following command in the terminal:
oc new-project coolstore-dev-{user}-
Clone the project to access the files.
git clone -b main --single-branch https://gitea-gitea.{subdomain}/user1/workshop ~/workshop-
Explore the yaml file that will deploy the catalog.
cd ~/workshop/content/modules/ROOT/files/module-01-
Install the the Coolstore components:
oc apply -f coolstore.yamloutput:
deployment.apps/gateway-vertx created
service/gateway-vertx created
route.route.openshift.io/gateway-vertx created
deployment.apps/inventory-quarkus created
service/inventory-quarkus createdExplore the topology view
The Topology view in the Developer perspective of the web console provides a visual representation of all the applications within a project, their build status, and the associated components and services.
Review the set of microservices that composed the Coolstore application
-
Click on Topology to access the Developer’s Perspective
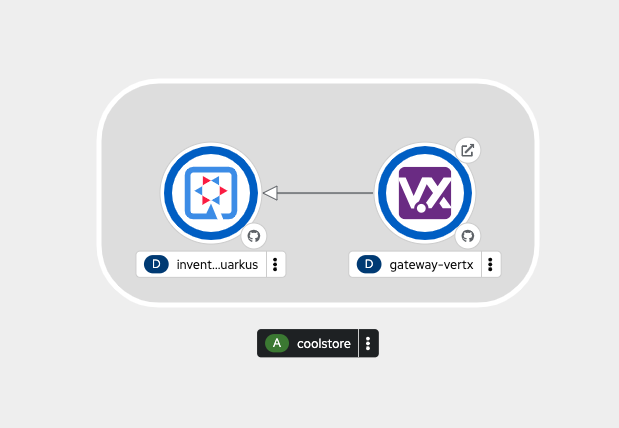
All the components shown are deployments, which are in charge of managing your application. They are all in blue, indicating that the application is running. The arrows will indicate which components are connected.
As you can see, everything is there except the UI and the catalog. In the next section, you will be moving the UI into OpenShift.
Import the application
In this section, you will move the UI source code into OpenShift using the Developer Perspective.
-
Access Developer Perspective by clicking on Developer on the left menu.
-
Click on +Add
-
Import from Git, under Git Repository
-
Git Repo URL
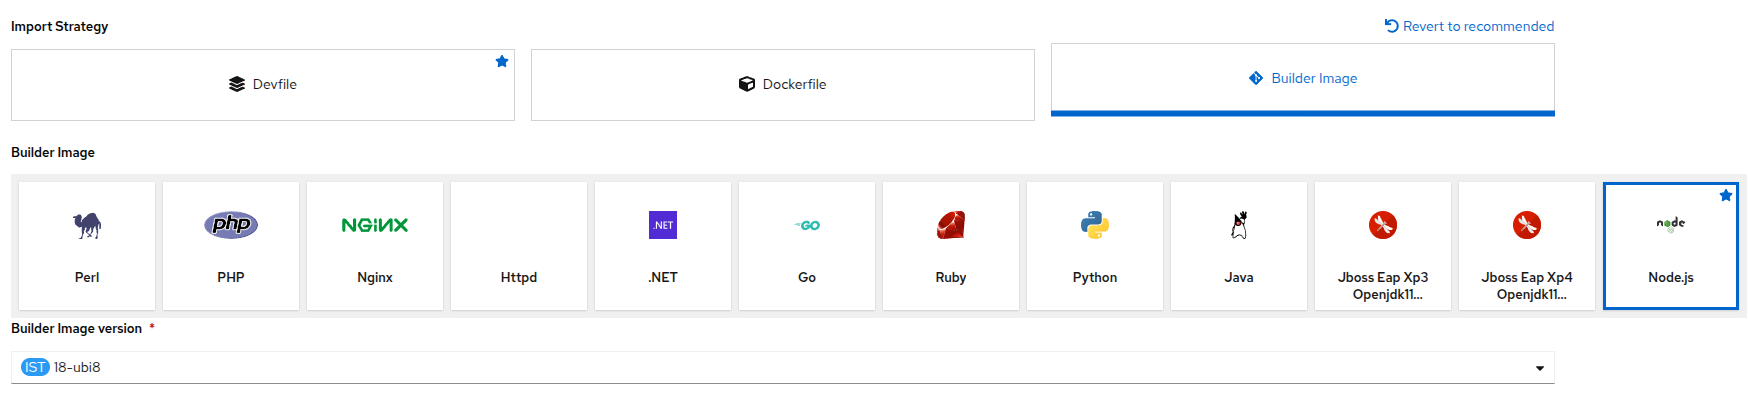
https://github.com/rhpds/web-nodejs.gitNote: Ignore the error "Danger alert: Import is not possible." You will be updating the Builder Option.
-
Edit Import Strategy and select Builder Image (keep Node.js but change to Builder Image version: 18-ubi8)
-
On Deploy → Resource Type, select Serverless Deployment
-
Click on Show advanced Deployment option: and add an environment variable to connect with the Gateway URL:
Note: Ensure you copy the entire Gateway URL before pasting it.
-
name:
SECURE_COOLSTORE_GW_ENDPOINT -
value:
https://gateway-vertx-coolstore-dev-{user}.{openshift_cluster_ingress_domain}/
Verify your input data is the same as shown below:
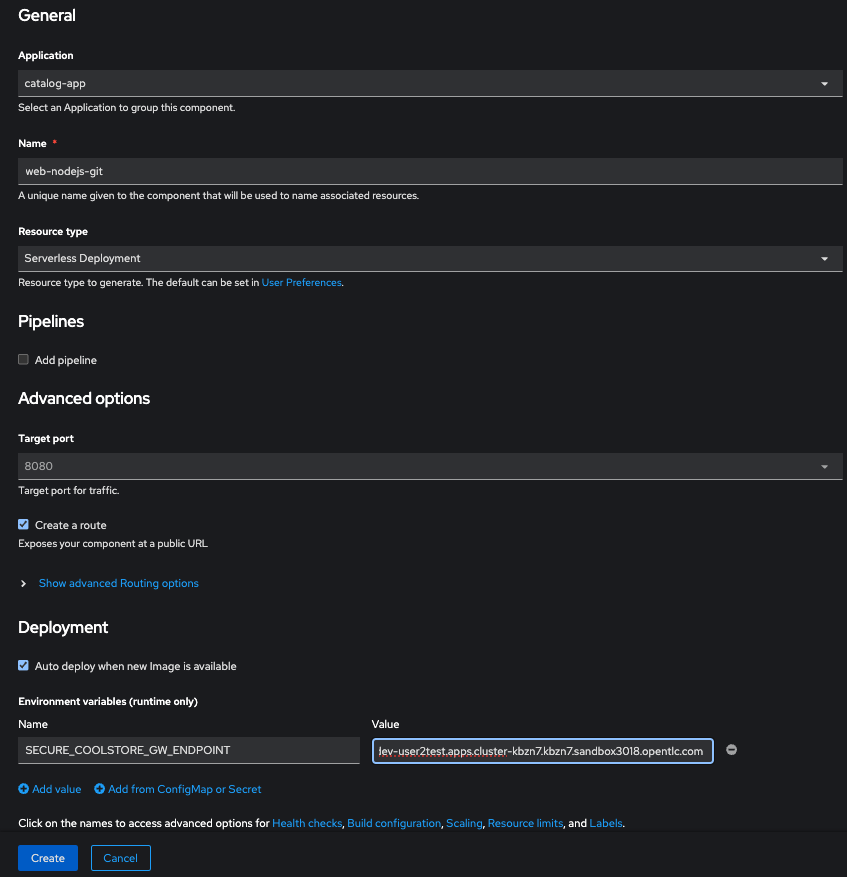
-
Click on Create
Verify build and deployment:
-
Select the new Service by clicking on No Revisions
-
On the right menu, Click on the Resources tab
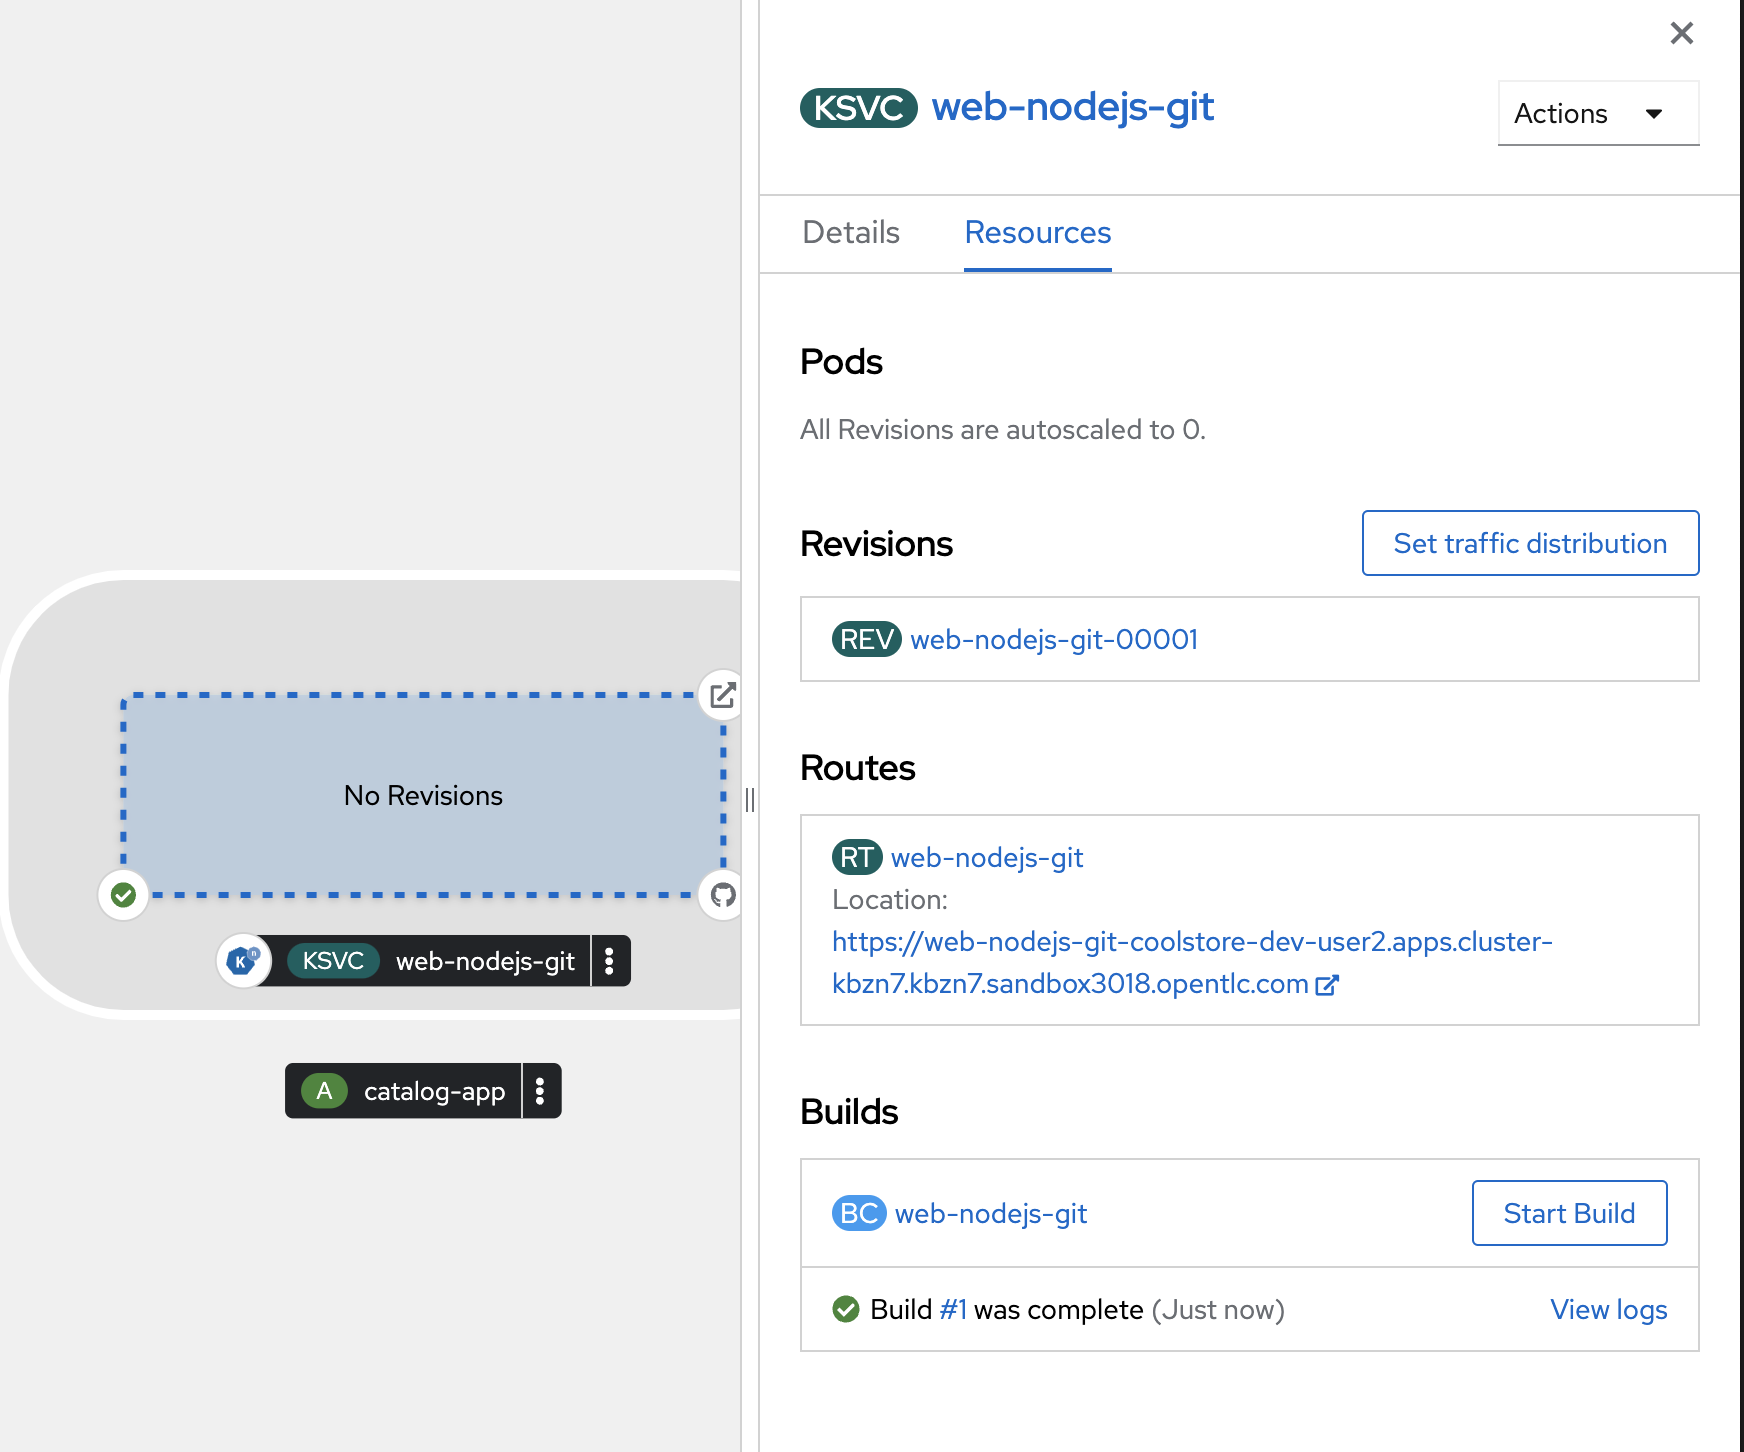
Note: Revision will be ready once the build process is completed.
-
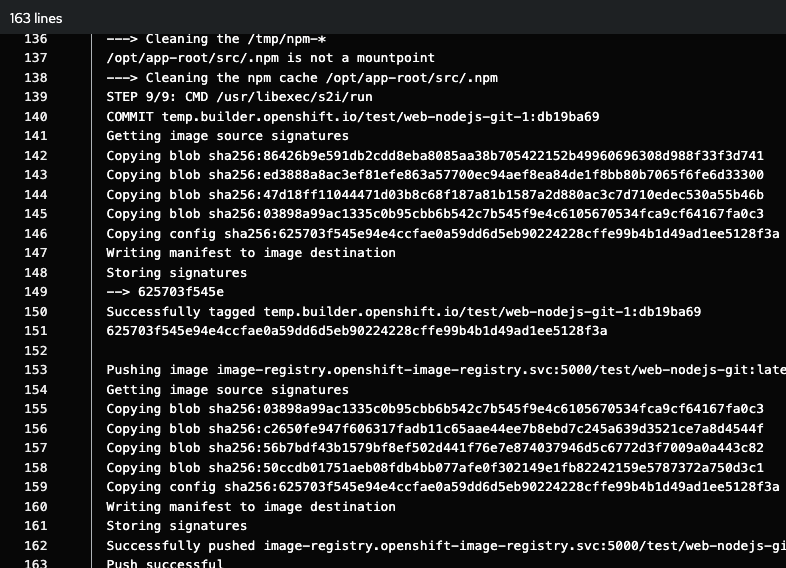
Verify the build process:
-
Click on the View Logs on the Builds section
-
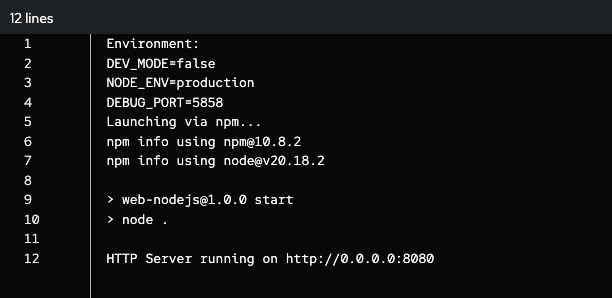
Verify that the build is running and that the logs have no issues. The log will show Push successful in the last line once has finished.
-
Notes: The build might take a few minutes to complete.
Once the Build has finished the application will run successfully.
-
Go back to the Topology view: Click on Topology on the left menu.
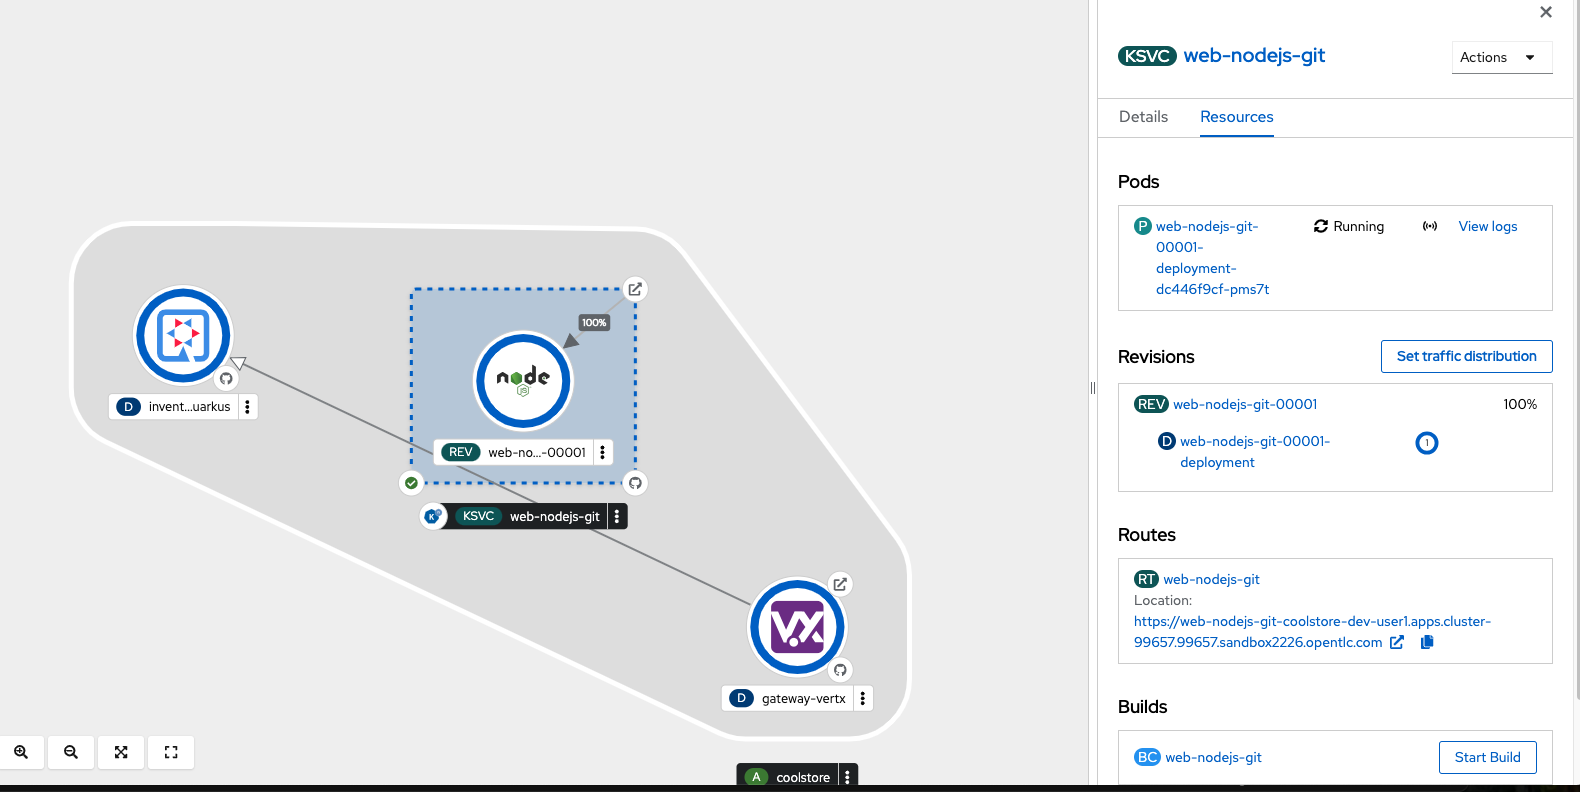
The application is triggered once the build process is completed. Additionally, the application will restart when it receives any HTTP requests by accessing the application in the web browser.
Verify the application is running
-
Click on the Routes under the Resources tab. Verify that the application is running.

Notes: As you can see, no catalog is available. We need to install the catalog application to access the catalog data.
-
Go back to the Topology view in the Web Console and select the web application.
-
Explore the application logs by clicking on View logs on the Resources Tab → Pods section.
-
Observe the pods scaling down to zero once there is no more traffic. A serverless application will only start running once it starts receiving traffic, and pods will be created depending on how much traffic the application will be receiving.
More information on Serving Autoscaling
Congratulations you build and deploy a new application into OpenShift in just a few clicks!
Building a backend application using the OpenShift Application Platform with OpenShift Pipelines
In this section, you will move the catalog Java Spring Boot application into OpenShift using the Developer Perspective. OpenShift will create an automated CI/CD pipeline and all the manifests required by the application.
CI/CD with OpenShift Pipelines
Red Hat OpenShift Pipelines is a cloud-native, continuous integration and continuous delivery (CI/CD) solution based on Kubernetes resources. It uses Tekton building blocks to automate deployments across multiple platforms by abstracting away the underlying implementation details. Tekton introduces a number of standard custom resource definitions (CRDs) for defining CI/CD pipelines that are portable across Kubernetes distributions.
OpenShift Pipelines provides a Kubernetes-native CI/CD framework to design and run each step of the CI/CD pipeline in its own container. It can scale independently to meet the on-demand pipelines with predictable outcomes.
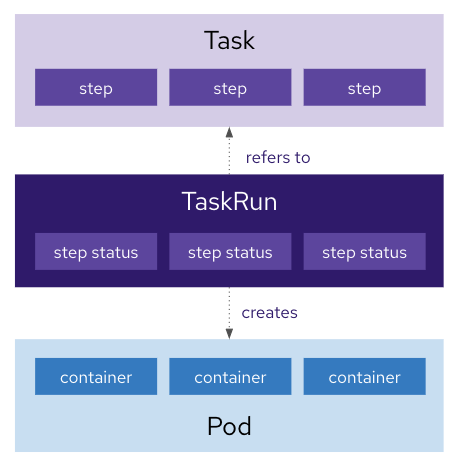
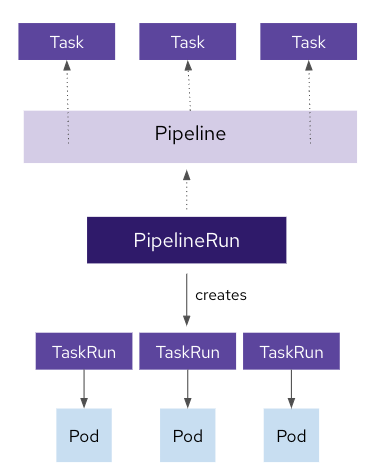
OpenShift Pipeline Concepts
-
Task resources are the building blocks of a pipeline and consist of sequentially executed steps. It is essentially a function of inputs and outputs.
-
Steps are a series of commands that are sequentially executed by the task and achieve a specific goal, such as building an image.
-
Task Run An invocation of a task with inputs and outputs
-
Pipeline Resource Inputs and outputs to tasks and pipelines (git, image, etc)
-
Pipeline A graph of tasks executed in a certain order
-
Pipeline Run An invocation of a pipeline with inputs and outputs
Create your backend application
-
Access Developer Perspective
-
Click on +Add
-
Import from Git, under Git Repository
-
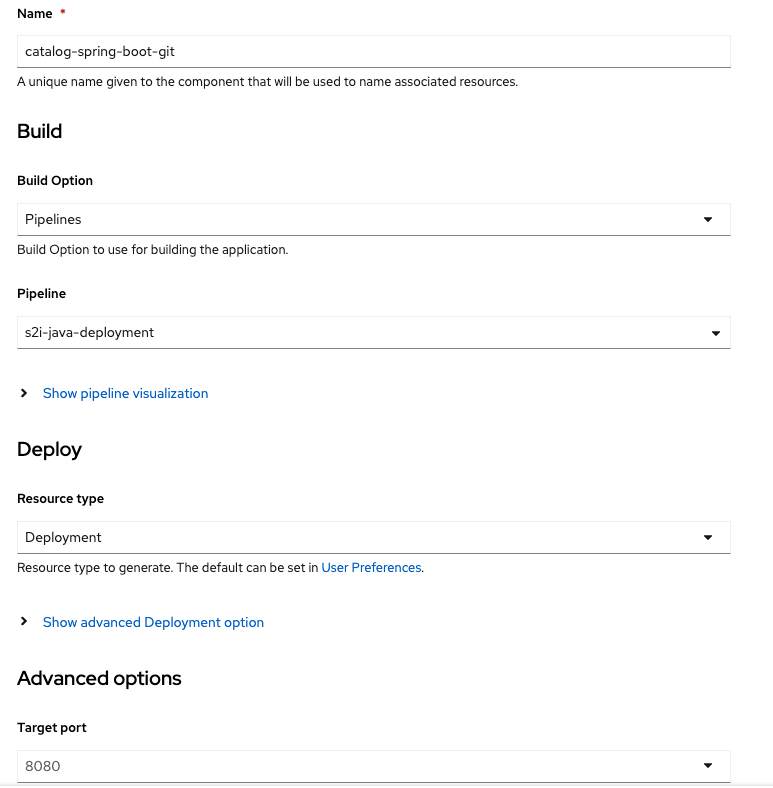
Git Repo URL:
https://github.com/rhpds/catalog-spring-boot.gitNote: Ignore the error "Danger alert: Import is not possible." You will be updating the Builder Option.
-
Edit Import Strategy and select Builder Image (keep Java and Builder Image version: openjdk-17-ubi8)
-
On Build → Build Option, select Pipelines
-
On Resource Type, select Deployment
Verify your input data is the same as shown below:
-
Click on Create
Verify build and deployment:
-
Click the new Deployment catalog-spring-boot on the Topology view
-
Click on Pipeline Runs

-
Verify that the pipeline is running and that everything is green.
Notes: The pipeline might take a few minutes to complete. Explore the Pipeline Run logs.
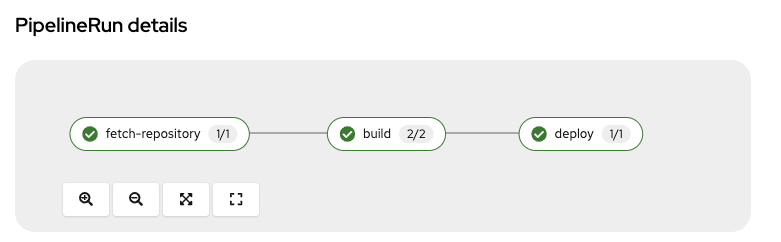
Once the Pipeline has finished, it will be shown as Pipeline Succeeded, and Pod will run successfully.
-
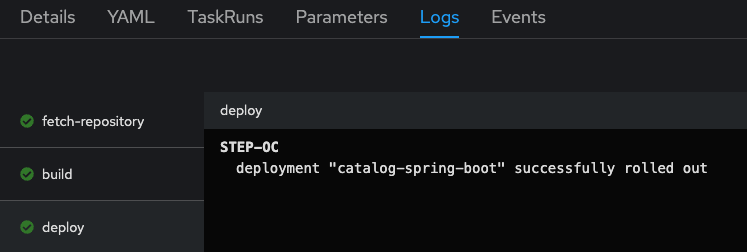
Explore the Pipeline logs:
-
Click on the Logs tab and explore the logs generated by each Task.
-
-
Verify the application is running as expected
-
Return to the topology view: Click Topology on the left menu.
-
Click on the UI Serverless deployment, web-nodejs-git…
-
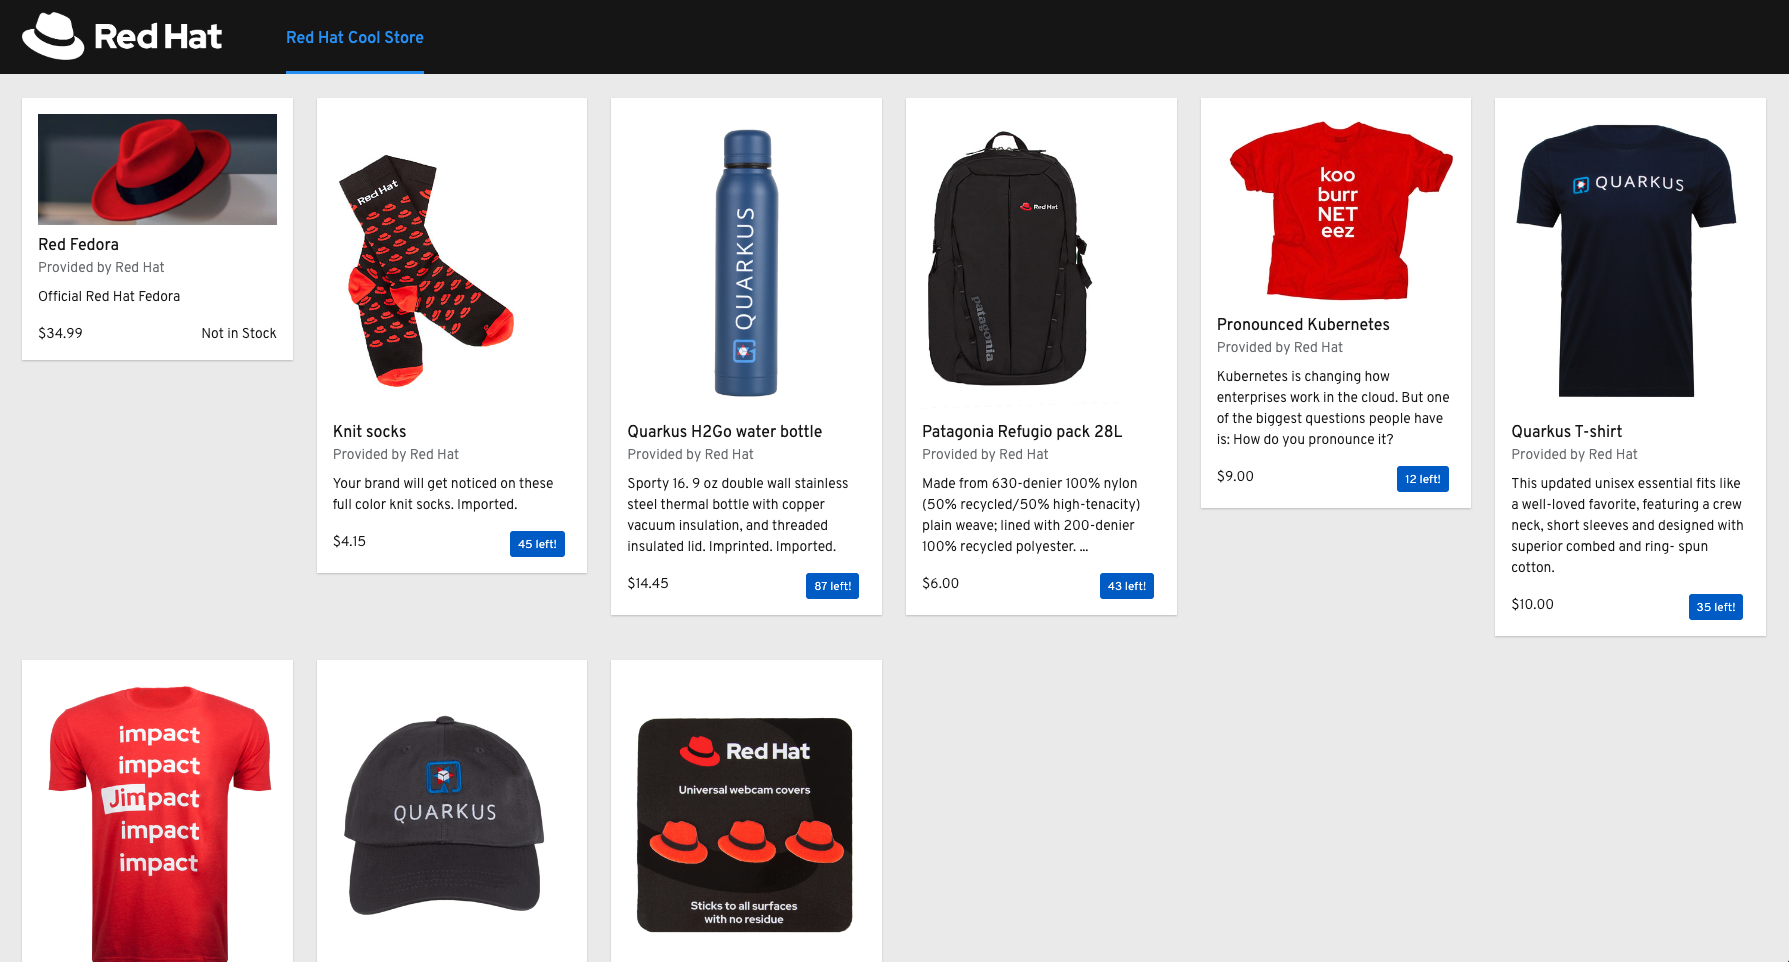
Click on the Routes under the Resources tab. Verify that the application is running.
-
The catalog information is now available.
-
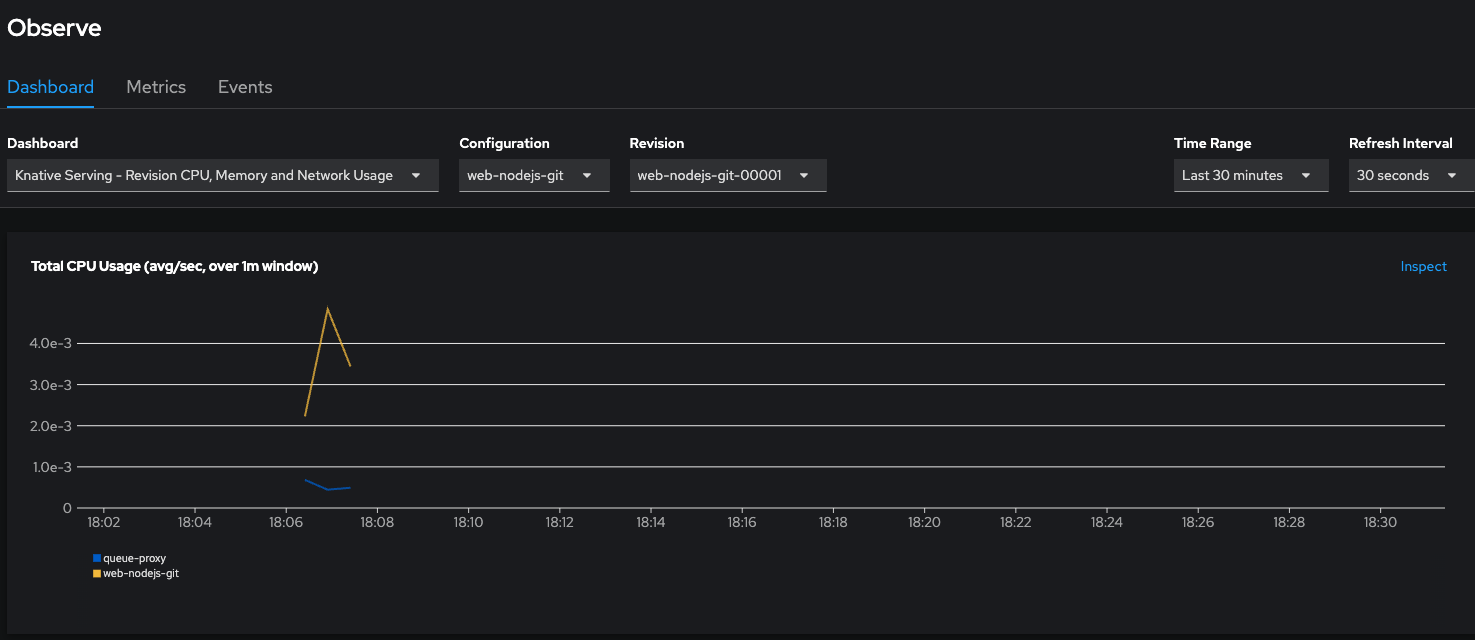
Observe the application CPU usage
In the Observe section of OpenShift Container Platform web console, you can access and manage monitoring features such as metrics, alerts, monitoring dashboards, and metrics targets. More information
-
Go back to the Topology View, Click on Topology on the left menu.
-
Access the Observe tab.
-
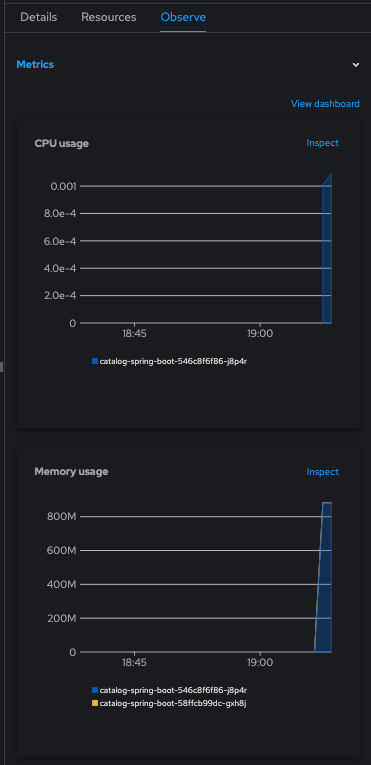
Click on View Dashboard to explore the application metrics:

-
Explore the CPU Usage:
-
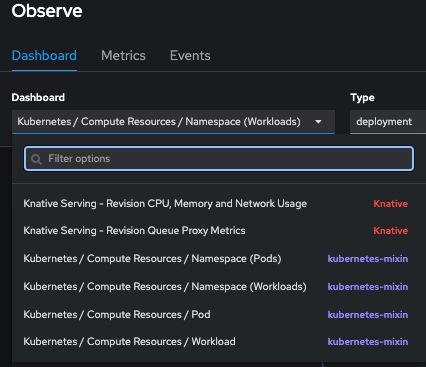
Explore all the available metrics:
-
Select from the Dashboard dropdown the different metrics.
-
-
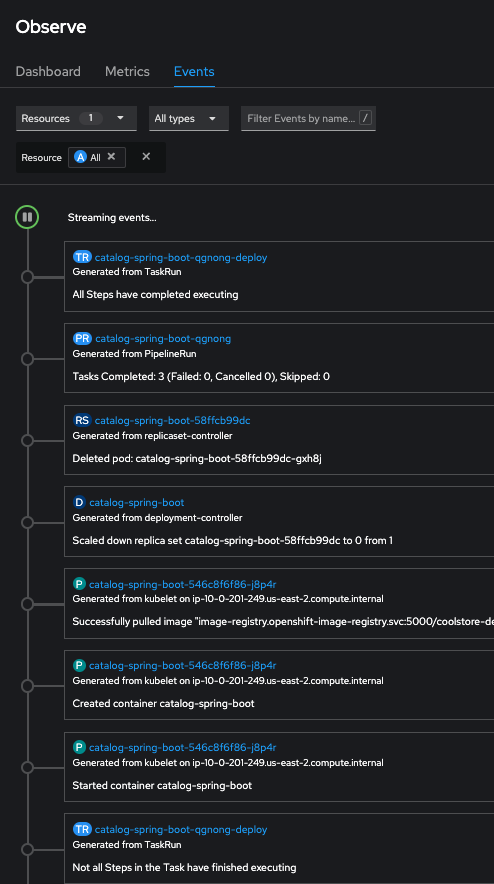
Explore the events:
Conclusion
With the Developer Perspective, you can create, build, and manage applications or the command line. The Developer perspective is a powerful tool that enables you to move applications from a Git repository, helm chart, jar file, and much more. Serverless allows the deployment of applications without the burden of operations. The application’s pods will be created depending on how much traffic is received. Serverless is a way to save costs since the applications will only run when receiving traffic. OpenShift Pipelines allows teams to build and deploy applications via CI/CD. Pipelines can be autogenerated when selecting the The pipelines checkbox can be enhanced considering your organization’s requirements and guidelines.